
How to install 15mm round hole gypsum board on a wooden frame?
Oct 21, 2025
Leave a message
Hey there! As a supplier of Gypsum Board 15mm Round Hole, I've seen firsthand how this type of gypsum board can transform a space. It's not only aesthetically pleasing but also has practical applications, like sound absorption. In this blog, I'm gonna walk you through the process of installing 15mm round hole gypsum board on a wooden frame.
Pre - installation Preparations
Before you start nailing or screwing anything, you gotta get everything ready. First off, measure the area where you plan to install the gypsum board. This will help you figure out how many boards you need. Make sure to account for any cutouts for things like electrical outlets or light fixtures.
Next, gather all the tools you'll need. You'll need a measuring tape, a circular saw or a utility knife for cutting the boards, a drill with the appropriate bits for screwing, a hammer if you're using nails, and a level to ensure the wooden frame is straight.
When it comes to the wooden frame, it should be sturdy and well - built. Check for any loose joints or weak spots. The spacing between the wooden studs should be appropriate for the 15mm round hole gypsum board. Usually, a spacing of 400 - 600mm is good, but it's always best to double - check the manufacturer's recommendations.
Cutting the Gypsum Board
Once you've got your measurements, it's time to cut the gypsum board. If you're using a circular saw, make sure to set the blade depth correctly so you don't cut through anything else. Mark the cutting line on the board using a straightedge and a pencil.
If you're using a utility knife, score the board along the cutting line several times. Then, place the board on the edge of a table or a support, with the scored line overhanging. Apply pressure on the part of the board that's hanging over, and it should break cleanly along the scored line.
For cutouts around electrical outlets or other fixtures, use a keyhole saw. Just trace the outline of the fixture on the board and carefully cut along the line.
Attaching the Gypsum Board to the Wooden Frame
Now that you've got your boards cut, it's time to attach them to the wooden frame. You can use either nails or screws for this. If you're using nails, make sure they're long enough to penetrate the wooden studs. A 1 - 1.5 inch nail is usually a good choice.
Start at one corner of the board and work your way across. Place the nails or screws about 150 - 200mm apart along the edges of the board and 300 - 400mm apart in the middle. Make sure the board is flush against the wooden frame as you attach it.
Use a level to check that the board is straight as you go. If the board is a bit off, you can gently tap it into place with a hammer or adjust the screws.
Dealing with Joints
When you're installing multiple boards, you'll have joints between them. To ensure a smooth finish, you can use joint tape and joint compound. First, apply a thin layer of joint compound over the joint. Then, place the joint tape over the compound and press it down firmly.
Apply another layer of joint compound over the tape, making sure to smooth it out. Let the joint compound dry completely according to the manufacturer's instructions. You may need to apply a second or even a third layer of compound for a really smooth finish.
Finishing Touches
After all the boards are installed and the joints are finished, you can sand the surface of the gypsum board to make it smooth. Use a fine - grit sandpaper and sand in a circular motion. This will help remove any rough edges or bumps.


Once the sanding is done, you can paint the gypsum board. You can choose any paint color you like, depending on the look you're going for. Just make sure to use a paint that's suitable for gypsum board.
Tips and Tricks
- Always wear safety gear, like goggles and a dust mask, when cutting or sanding the gypsum board. The dust can be harmful if inhaled.
- If you're not sure about the spacing of the wooden studs or the installation process, don't hesitate to contact the manufacturer or a professional.
- Take your time with the installation. Rushing can lead to mistakes, and it's better to do it right the first time.
Why Choose Our Gypsum Board 15mm Round Hole
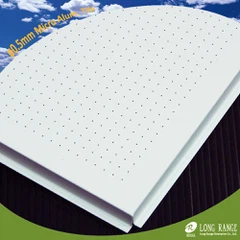
Our Gypsum Board 15mm Round Hole is of high quality. The round holes are evenly spaced and precisely drilled, which not only looks great but also provides excellent sound - absorbing properties.
The board is made from high - grade gypsum, which is strong and durable. It's also easy to install, as described in this blog. Whether you're working on a small home project or a large commercial building, our gypsum board is a great choice.
Contact Us for Purchasing
If you're interested in purchasing our 15mm round hole gypsum board, we'd love to hear from you. We can offer you competitive prices and excellent customer service. Just reach out to us, and we'll be happy to discuss your requirements and provide you with a quote.
References
- Gypsum Board Installation Manuals
- Construction Industry Standards for Interior Finishes
Send Inquiry