

How to adjust the parameters of a 24mm face grid?
Jun 05, 2025
Leave a message
In the field of interior decoration, 24mm face grids play a crucial role in suspended ceiling systems. As a professional 24mm face grid supplier, I've witnessed firsthand how the proper adjustment of grid parameters can transform a space from ordinary to extraordinary. This blog aims to provide a comprehensive guide on how to adjust the parameters of a 24mm face grid, ensuring optimal performance and aesthetic appeal.
Understanding the Basics of a 24mm Face Grid
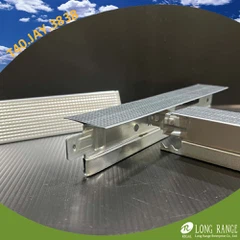
Before delving into parameter adjustment, it's essential to understand what a 24mm face grid is. A 24mm face grid refers to the width of the visible part of the grid that forms the framework for ceiling tiles. It comes in various types, including T24, UT24, etc., each with different profiles such as MT38h and CT38h or CT28h, and may have Jay Ends for specific installation requirements. For example, you can explore different options like Suspended Ceiling Grid T24 MT38h CT38h Jay Ends, Suspended Ceiling Grid T24 MT38h CT28h Jay Ends, and Suspended Ceiling Grid UT24 MT38h CT38h Jay Ends.
Key Parameters to Consider
1. Spacing
The spacing between the grid members is a critical parameter. It affects the overall appearance of the ceiling and the stability of the ceiling tile installation. Generally, for a standard 24mm face grid, the spacing should be determined based on the size of the ceiling tiles. If the tiles are larger, wider spacing can be used, but it should not exceed the recommended maximum to ensure the tiles are properly supported. A common practice is to keep the spacing between 600mm to 1200mm, depending on the load - bearing capacity of the grid and the type of tiles.
2. Levelness
Ensuring the grid is level is essential for a professional - looking ceiling. Even a slight deviation in levelness can make the ceiling appear uneven, which is not only aesthetically unpleasing but can also cause problems with tile installation. To check the levelness, use a laser level or a long straightedge. If the grid is not level, shims can be used to adjust the height at the support points.
3. Alignment
Proper alignment of the grid members is necessary for a seamless look. The main grid runners should be parallel to each other, and the cross - tees should be perpendicular to the main runners. Misaligned grids can lead to gaps between the tiles or make the tiles difficult to install. Use string lines or alignment tools to ensure accurate alignment during installation.
4. Tension
The tension in the grid system can affect its stability. If the grid is too loose, the ceiling tiles may sag over time, especially if there is any vibration or movement in the building. On the other hand, excessive tension can cause the grid to warp or break. The tension can be adjusted by tightening or loosening the support wires or clips at the connection points.


Step - by - Step Parameter Adjustment
Step 1: Planning
Before installation, carefully measure the ceiling area and plan the layout of the grid. Mark the positions of the main runners and cross - tees on the ceiling or the support structure. Consider the location of any light fixtures, ventilation ducts, or other ceiling penetrations and plan the grid layout accordingly.
Step 2: Installation of Main Runners
Install the main runners first. Hang them from the ceiling using support wires or clips at the pre - marked positions. Make sure the runners are level and properly aligned. Use a level to check the horizontal and vertical alignment. If necessary, adjust the height of the support wires to achieve the desired levelness.
Step 3: Installation of Cross - Tees
Once the main runners are in place, install the cross - tees. Insert them into the slots on the main runners and ensure they are perpendicular to the main runners. Check the alignment and spacing of the cross - tees. If the spacing is not correct, re - position the cross - tees as needed.
Step 4: Final Checks
After all the grid members are installed, conduct a final check of the levelness, alignment, and tension. Walk around the room and view the ceiling from different angles to ensure it looks even and professional. Use a straightedge to check for any high or low spots. Make any necessary adjustments to the support wires or shims.
Troubleshooting Common Parameter Issues
Uneven Spacing
If you notice uneven spacing between the grid members, it may be due to inaccurate measurement during installation. To correct this, remove the affected cross - tees or runners and re - measure and re - install them at the correct positions.
Sagging Grid
A sagging grid can be caused by insufficient support or excessive load. Check the support wires and clips to ensure they are tight. If the problem persists, additional support may be required. You can add more support wires or use stronger support structures.
Misaligned Grid
If the grid is misaligned, carefully loosen the connection points and re - align the members. Use alignment tools to ensure accurate alignment and then tighten the connection points again.
Importance of Quality Grid Products
Using high - quality 24mm face grid products is crucial for successful parameter adjustment. Inferior grids may be more prone to warping, breaking, or not holding the correct shape. As a supplier, I always recommend choosing grids that are made from high - quality materials, such as galvanized steel or aluminum, which offer better durability and stability.
Conclusion
Adjusting the parameters of a 24mm face grid is a meticulous process that requires attention to detail. By carefully considering and adjusting the spacing, levelness, alignment, and tension, you can achieve a beautiful and functional ceiling. Whether you are a contractor, an interior designer, or a DIY enthusiast, following these guidelines will help you create a ceiling that meets your expectations.
If you are interested in purchasing high - quality 24mm face grid products for your next project, we are here to assist you. Our team of experts can provide you with professional advice on grid selection and installation. Please feel free to contact us to start a procurement discussion.
References
- Interior Design Handbook for Ceiling Systems, 3rd Edition
- Guide to Suspended Ceiling Installation, National Construction Association
Send Inquiry